- 自由研究に戻る
- Menu表示

2012.05.05 ひたち海浜公園
Notification、AlarmManager
Web天気予報をダウンロードし、Notificationに通知する
Notificationの確認です。
・ステータスに何かのアイコンを表示
・指定時刻(AlermManager使用)とServiceを使い、webサイトにアクセスし、天気予報をダウンロード
・Serviceの中で、Notificationに何か(天気予報)を通知する
・Notificationで選択されたら、Activityを起動し、Notificationを消去する。
の確認をしてみます。
下記サイトを参考にしながら動作を確認していきます。
(1)ステータスバーに通知する(NotificationとNotificationManager)
(2)Android Notification解説
(3)ソフトウェア技術ドキュメントを勝手に翻訳
(4)ステータス通知(Notification)を変化させる
ステータスバー(通知バー)でアニメーションさせるためにServiceを利用しています。
(5)Androidの使い方FAQ,通知バー/ステータスバー、通知領域って何ですか?
通知バー/ステータスバー、通知領域の説明があります。画面最上部の表示部分で“通知”は左側に、“ステータス(状態)”は右側に表示するようです。”通知領域”は通知バーを下方向にフリック(画面をなぞる操作)すると出現します。
使い方は
■ Notification Managerのインスタンスを取得する。
- mNotificationManager = (NotificationManager) getSystemService(Context.NOTIFICATION_SERVICE);
■ Notificationコンストラクタを呼び出す
-ステータスバーにどのような情報を表示するのかを設定するクラスです。 重要なメソッドは、コンストラクタと、setLatestEventInfoです。
-Notification notification = new Notification(icLauncher, null, System.currentTimeMillis());
コンストラクタは3つ用意されている
-cLauncher=ステータスバーに表示するアイコンのリソースIDを指定
-null =ステータスバーにNotificationアイコンが表示される前に、表示される短いテキスト(nullの場合は表示なし)
-System.currentTimeMillis()=表示する時刻を設定,System.currentTimeMillis()は現在時刻
■PendingIntentの作成(notificationが選択された場合に発行するintentをPendingIntentで指定)
-PendingIntentはタイミングを指定したインテント
-ユーザーがnotificationを選択した時にActivityを起動
-PendingIntent contentIntent = PendingIntent.getActivity(this, 0,new Intent(this, NotificationActivity.class), 0);
■notificationを設定
テキストメッセージを設定(更新)します。
-notification.setLatestEventInfo(this, "NotificationService",string, contentIntent);
notify() を呼び出して通知を更新
-mNotificationManager.notify(NOTIFICATION_ID, notification);
■NotificationManagerのメソッド種類
・cancel(int id)
指定したIDの通知情報を削除します。(例ではNOTIFICATION_ID:notifyメソッドをコールした際に指定したID)
・cancelAll()
全ての通知情報を削除します。(他のアプリケーションの通知情報以外)
・notify(int id, Notification notification)
通知情報をステータスバーに表示。
■実施例
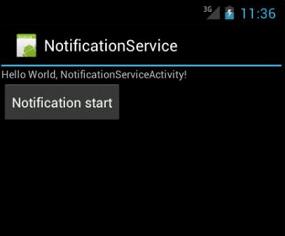
Fig.1 起動画面、start buttonでスタート
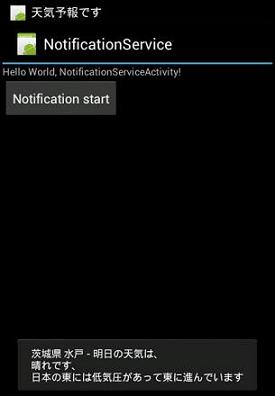
Fig.2天気予報をトーストで表示し、音声読み上げを行う
ステータスバーに「アイコン」と「天気予報です」のテロップメッセージ表示
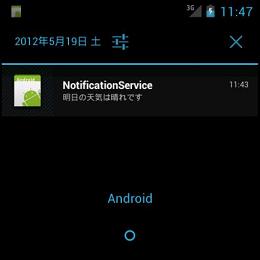
Fig.3 表示領域への表示
何か、殺風景な感じがします。Androidという表示変更はどうすればいいのでしょうか。
カスタム展開ビュー、カスタムレイアウト
使い方
notification.setLatestEventInfo(this, "NotificationService",string, contentIntent);
は使えなくなります。
■カスタムレイアウトのxmlファイルを作る
■イメージとテキストの定義に RemoteViews のメソッドを使用しています。その後、Notification の contentView フィールドに RemoteViews オブジェクトを代入します。
例:
mNotificationManager = (NotificationManager) getSystemService(Context.NOTIFICATION_SERVICE);
RemoteViews contentView = new RemoteViews(getPackageName(), R.layout.custom_notification_layout);
contentView.setImageViewResource(R.id.image, icLauncher);
contentView.setTextViewText(R.id.text, string);
//通知内容を決定 コンストラクタを呼び出す
Notification notification = new Notification(icLauncher, "天気予報です", System.currentTimeMillis());
notification.contentView = contentView;
//PendingIntentはタイミングを指定したインテント
//今回はユーザーがnotificationを選択した時にActivityを起動
Intent intent = new Intent(this, NotificationActivity.class);
PendingIntent contentIntent = PendingIntent.getActivity(this, 0,intent, 0);
notification.contentIntent = contentIntent;
mNotificationManager.notify(CUSTOM_VIEW_ID, notification);
・「RemoteViews」というインスタンスは、リモートでアクセスされるViewです。これは引数にパッケージ名とリソースのレイアウトIDを渡し、指定のレイアウトにリモートでアクセス出来ます。
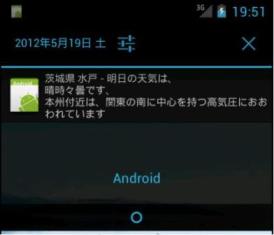
Fig.4 カスタムレイアウトで表示領域への表示
表示領域のテキストをsetTextViewTextで設定しています。
============================================================================
■ソース、実施例(1)setLatestEventInfo()を使ってデフォルトのnotification表示
============================================================================
file 構成
src notificationService.app
AlarmReciever.java--起動されたService、ここでnotificationを設定する、天気予報の読み込も行う
NotificationActivity.java--notificationをクリックしたときの処理を実行
NotificationServiceActivity.java--メインのActivity、Serviceを起動する
AndroidManifest.xml
/****************************************************************************
NotificationServiceActivity.java--メインのActivity、Serviceを起動する
package notificationService.app;
import java.util.Calendar;
import android.app.Activity;
import android.app.AlarmManager;
import android.app.PendingIntent;
import android.content.Context;
import android.content.Intent;
import android.os.Bundle;
import android.view.View;
import android.widget.Button;
import android.widget.TextView;
import android.widget.Toast;
public class NotificationServiceActivity extends Activity implements View.OnClickListener{
private Button buttonStart;
TextView mTextView;
/** Called when the activity is first created. */
@Override
public void onCreate(Bundle savedInstanceState) {
super.onCreate(savedInstanceState);
setContentView(R.layout.main);
mTextView = (TextView)findViewById(R.id.button1);
// ボタンのClickListenerの登録
buttonStart = (Button)findViewById(R.id.button1);
buttonStart.setOnClickListener(this);
}
public void onClick(View arg0) {
if (buttonStart == arg0) {
//mTextView.setText("AlarmManager start");
Toast.makeText(this, "AlarmManager started!", Toast.LENGTH_SHORT).show();
alarmSet();
}else {}
}
private void alarmSet() {
Intent intent = new Intent(NotificationServiceActivity.this, AlarmReceiver.class);
PendingIntent sender = PendingIntent.getService(NotificationServiceActivity.this, 0, intent, 0);
Calendar calendar = Calendar.getInstance();
calendar.setTimeInMillis(System.currentTimeMillis());
calendar.add(Calendar.SECOND, 10);
AlarmManager alarmManager = (AlarmManager) getSystemService(Context.ALARM_SERVICE);
// one shot
alarmManager.set(AlarmManager.RTC_WAKEUP, calendar.getTimeInMillis(), sender);
Toast.makeText(NotificationServiceActivity.this, "Start Alarm!", Toast.LENGTH_SHORT).show();
}
}
/****************************************************************************
AlarmReciever.java--起動されたService、ここでnotificationを設定する、天気予報の読み込も行う
package notificationService.app;
import java.io.InputStream;
import java.net.HttpURLConnection;
import java.net.URL;
import java.util.Locale;
import org.xmlpull.v1.XmlPullParser;
import android.app.Notification;
import android.app.NotificationManager;
import android.app.PendingIntent;
import android.app.Service;
import android.content.Context;
import android.content.Intent;
import android.os.Handler;
import android.os.IBinder;
import android.speech.tts.TextToSpeech;
import android.util.Log;
import android.util.Xml;
import android.widget.Toast;
public class AlarmReceiver extends Service implements TextToSpeech.OnInitListener {
private Handler mHandler = new Handler(); //Handlerのインスタンス生成
private String src ;
private String src2;
private TextToSpeech tts;
private NotificationManager mNotificationManager;
private static int NOTIFICATION_ID = R.layout.main;
@Override
public IBinder onBind(Intent arg0) {
// TODO 自動生成されたメソッド・スタブ
return null;
}
@Override
public void onCreate() {
super.onCreate();
Toast.makeText(this, "Alarm onCreate!", Toast.LENGTH_SHORT).show();
mNotificationManager = (NotificationManager) getSystemService(Context.NOTIFICATION_SERVICE);
}
@Override
public int onStartCommand(Intent intent, int flags, int startId) {
Toast.makeText(this, "Alarm onStart!", Toast.LENGTH_SHORT).show();
tts = new TextToSpeech(this, this); // This is a good place to set spokenText
httpWeather(); //天気予報をダウンロード
return START_STICKY;
}
@Override
public void onDestroy() {
super.onDestroy();
if (null != tts) {
// TextToSpeechのリソースを解放する
tts.shutdown();
}
//サービスの停止時、通知内容を破棄する
mNotificationManager.cancel(NOTIFICATION_ID);
}
public void onInit(int status) {
if (TextToSpeech.SUCCESS == status) {
Locale locale = Locale.ENGLISH;
if (tts.isLanguageAvailable(locale) >= TextToSpeech.LANG_AVAILABLE) {
tts.setLanguage(locale);
} else {Log.d("", "Error SetLocale"); }
} else {Log.d("", "Error Init"); }
}
private void speechText(String string) {
if (0 < string.length()) {
if (tts.isSpeaking()) {
// 読み上げ中なら止める
tts.stop();
} // 読み上げ開始
tts.speak(string, TextToSpeech.QUEUE_FLUSH, null);
}
}
private void httpWeather() {
// スレッド起動
(new Thread(new Runnable() {
// @Override
public void run() {
// 通常バックグランドをここに記述します
int intEventType = -1;
String strParserName = "";
String strGettingTitle = "";
String strGettingTelop = "";
String strGettingDiscription = "";
HttpURLConnection http = null;
InputStream in = null;
try{
//取得XMLのURIを設定
//uri += "?city=" + id + "&day=tomorrow";
URL uri = new URL("http://weather.livedoor.com/forecast/webservice/rest/v1?city=54&day=tomorrow");
//XML取得
http = (HttpURLConnection)uri.openConnection();
http.setRequestMethod("GET");
http.connect();
// データを取得
in = http.getInputStream();
//XMLから情報を抽出
XmlPullParser parser = Xml.newPullParser();
parser.setInput(in,"UTF-8");
while(intEventType != XmlPullParser.END_DOCUMENT){
switch (intEventType){
case XmlPullParser.START_TAG:
strParserName = parser.getName() ;
if(strParserName.equals("title") && strGettingTitle.equals("")){
strGettingTitle = parser.nextText()+"は、";
}
if(strParserName.equals("telop") && strGettingTelop.equals("")){
src2=parser.nextText();
strGettingTelop = src2+"です、";
}
if(strParserName.equals("description") && strGettingDiscription.equals("")){
strGettingDiscription = parser.nextText();
String[] strAry=strGettingDiscription.split("。",2);
strGettingDiscription=strAry[0]; //descriptionは1文のみ表示
}
}
if(!strParserName.equals("") && !strGettingTelop.equals("") && !strGettingDiscription.equals("")){
break;
}
intEventType = parser.next();
}
//取得データを画面に表示
src=strGettingTitle + "\n" + strGettingTelop + "\n" + strGettingDiscription;
}catch(Exception e){
src=e.toString();
}finally{
}
mHandler.post(new Runnable(){
public void run() {
Toast.makeText(getApplicationContext(),src, Toast.LENGTH_LONG).show();
//Notification コンストラクタを呼び出す
showNotification(R.drawable.ic_launcher,"明日の天気は"+src2+"です");
}
});
speechText(src);
}
})).start();
}
private void showNotification(int icLauncher, String string) {
//通知内容を決定 コンストラクタを呼び出す
Notification notification = new Notification(icLauncher, "天気予報です", System.currentTimeMillis());
//PendingIntentはタイミングを指定したインテント
//今回はユーザーがnotificationを選択した時にActivityを起動
Intent intent = new Intent(this, NotificationActivity.class);
PendingIntent contentIntent = PendingIntent.getActivity(this, 0,intent, 0);
//notificationを設定
notification.setLatestEventInfo(this, "NotificationService",string, contentIntent);
mNotificationManager.notify(NOTIFICATION_ID, notification);
}
}
/****************************************************************************
NotificationActivity.java<--notificationをクリックしたときの処理を実行
package notificationService.app;
import android.app.Activity;
import android.app.NotificationManager;
import android.content.Context;
import android.os.Bundle;
import android.widget.Toast;
public class NotificationActivity extends Activity{
private static int NOTIFICATION_ID = R.layout.main;
private NotificationManager mNotificationManager;
@Override
public void onCreate(Bundle savedInstanceState) {
super.onCreate(savedInstanceState);
Toast.makeText(this, "NotificationActivity onCreate!", Toast.LENGTH_LONG).show();
mNotificationManager = (NotificationManager) getSystemService(Context.NOTIFICATION_SERVICE);
mNotificationManager.cancel(NOTIFICATION_ID);
finish();
}
}
/****************************************************************************
AndroidManifest.xml
<?xml version="1.0" encoding="utf-8"?>
<manifest xmlns:android="http://schemas.android.com/apk/res/android"
package="notificationService.app"
android:versionCode="1"
android:versionName="1.0" >
<uses-sdk android:minSdkVersion="15" />
<uses-permission android:name="android.permission.INTERNET"></uses-permission>
<application
android:icon="@drawable/ic_launcher"
android:label="@string/app_name" >
<activity
android:name=".NotificationServiceActivity"
android:label="@string/app_name" >
<intent-filter>
<action android:name="android.intent.action.MAIN" />
<category android:name="android.intent.category.LAUNCHER" />
</intent-filter>
</activity>
<activity
android:name=".NotificationActivity"
android:label="NotificationActivity" >
<intent-filter>
<action android:name="android.intent.action.MAIN" />
</intent-filter>
</activity>
<service
android:enabled="true"
android:name=".AlarmReceiver" />
</application>
</manifest>
============================================================================
■ソース、実施例(2)カスタムビューを使う
============================================================================
/****************************************************************************
変更ファイル
AlarmReciever.java--起動されたService、ここでカスタムレイアウトのnotificationを設定する
追加ファイル
custom_notification_layout.xml
/*****************************************************************************
AlarmReciever.javaの変更箇所
private void showNotification(int icLauncher, String string) {
mNotificationManager = (NotificationManager) getSystemService(Context.NOTIFICATION_SERVICE);
RemoteViews contentView = new RemoteViews(getPackageName(), R.layout.custom_notification_layout);
contentView.setImageViewResource(R.id.image, icLauncher);
contentView.setTextViewText(R.id.text, string);
//通知内容を決定 コンストラクタを呼び出す
Notification notification = new Notification(icLauncher, "天気予報です", System.currentTimeMillis());
notification.contentView = contentView;
//PendingIntentはタイミングを指定したインテント
//今回はユーザーがnotificationを選択した時にActivityを起動
Intent intent = new Intent(this, NotificationActivity.class);
PendingIntent contentIntent = PendingIntent.getActivity(this, 0,intent, 0);
notification.contentIntent = contentIntent;
mNotificationManager.notify(CUSTOM_VIEW_ID, notification);
}
/*****************************************************************************
custom_notification_layout.xml
<?xml version="1.0" encoding="utf-8"?>
<LinearLayout xmlns:android="http://schemas.android.com/apk/res/android"
android:orientation="horizontal"
android:layout_width="fill_parent"
android:layout_height="fill_parent"
android:padding="3dp" >
<ImageView android:id="@+id/image"
android:layout_width="wrap_content"
android:layout_height="fill_parent"/>
<TextView android:id="@+id/text"
android:layout_width="wrap_content"
android:layout_height="fill_parent" />
</LinearLayout>
参考サイト
沢山ありますがありがとうございました。