
2012.01.15 夢見ヶ崎動物公園、加瀬山、夕日に遊ぶ子供
- 自由研究に戻る
- Menu表示
TabのView切り替え
Tabについても、多くのサイトがありますが、やってみます。タブごとにActivityを割り当てる方法もありますが、手始めに同じActivityの中でTabのView切り替え表示を行ってみます。
Viewの切り替えはxmlファイルへの記述でも出来ますが、ここではcallBack関数(と両方)を使ってみます。
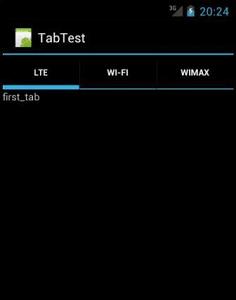
Fig.1 起動時他画面
初期値はtab1(LTE)が設定されている。ただし、callback関数(OnTabChangeListener())はtabが変更されたときに呼び出されるもので、LTEの下に表示されている"first_tab"はxmlファイルが表示したものである。
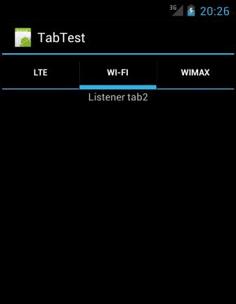
Fig.2 tab2(WI-FI)選択時
callback関数内で記述した"Listener tab2"が表示されているので、callbackが呼び出されている様子
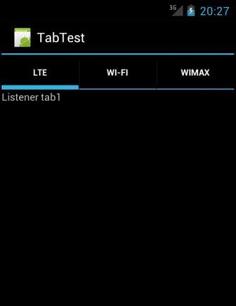
Fig.3 tab1(LTE)選択時(Fig.1とは異なる)
callback関数内で記述した"Listener tab1"が表示されているので、callbackが呼び出されている様子
//////////////////////////////////////////////////////////
/////////// xmlファイル///////////////////////////////////
<?xml version="1.0" encoding="utf-8"?>
<TabHost
xmlns:android="http://schemas.android.com/apk/res/android"
android:id="@+id/tabhost"
android:layout_width="fill_parent"
android:layout_height="fill_parent">
<LinearLayout
android:id="@+id/linearLayout1"
android:layout_width="fill_parent"
android:layout_height="wrap_content"
android:orientation="vertical" >
<TabWidget
android:id="@android:id/tabs"
android:layout_width="fill_parent"
android:layout_height="wrap_content"/>
<FrameLayout
android:id="@android:id/tabcontent"
android:layout_width="fill_parent"
android:layout_height="fill_parent" >
<LinearLayout
android:id="@+id/first_content"
android:layout_width="fill_parent"
android:layout_height="fill_parent">
<TextView android:id="@+id/textview1"
android:text="first_tab"
android:layout_width="wrap_content"
android:layout_height="wrap_content" />
</LinearLayout>
<LinearLayout android:id="@+id/second_content"
android:layout_width="fill_parent"
android:layout_height="fill_parent">
<TextView android:id="@+id/textview2"
android:text="second_tab"
android:layout_width="fill_parent"
android:layout_height="wrap_content"
android:gravity="center" />
</LinearLayout>
<LinearLayout android:id="@+id/third_content"
android:layout_width="fill_parent"
android:layout_height="fill_parent">
<TextView android:id="@+id/textview3"
android:text="third_tab"
android:layout_width="fill_parent"
android:layout_height="wrap_content"
android:gravity="right" />
</LinearLayout>
</FrameLayout>
</LinearLayout>
</TabHost>
///////////////////////////////////////////////////////////
/////////// javaファイル///////////////////////////////////
package tab.app;
import android.app.Activity;
import android.os.Bundle;
import android.widget.TabHost;
import android.widget.TabHost.OnTabChangeListener;
import android.widget.TabHost.TabSpec;
import android.widget.TextView;
public class TabTestActivity extends Activity {
/** Called when the activity is first created. */
@Override
public void onCreate(Bundle savedInstanceState) {
super.onCreate(savedInstanceState);
setContentView(R.layout.main);
TabHost host = (TabHost)findViewById(R.id.tabhost);
host.setup();
TabSpec tab1 = host.newTabSpec("tag1"); //任意の名前を付ける
tab1.setIndicator("LTE"); //Tabに表示されるタイトル、ビットマップもここで設定できるらしい
tab1.setContent(R.id.first_content); //Tabに対応数するレイアウト
host.addTab(tab1); //ここでTab作成完了
TabSpec tab2 = host.newTabSpec("tag2");
tab2.setIndicator("Wi-Fi");
tab2.setContent(R.id.second_content);
host.addTab(tab2);
TabSpec tab3 = host.newTabSpec("tag3");
tab3.setIndicator("WiMAX");
tab3.setContent(R.id.third_content);
host.addTab(tab3);
host.setOnTabChangedListener (new OnTabChangeListener() {
public void onTabChanged(String tabId) {
if(tabId=="tag1"){//Tabごとにviewを切り替える
TextView tv = (TextView) findViewById(R.id.textview1);
tv.setText("Listener tab1");
}
else if(tabId=="tag2"){
TextView tv = (TextView) findViewById(R.id.textview2);
tv.setText("Listener tab2");
}
else if(tabId=="tag3"){
TextView tv = (TextView) findViewById(R.id.textview3);
tv.setText("Listener tab3");
}
}
});
}
}
参考サイト
tabを利用してのviewを作成する。(素人のアンドロイドアプリ開発日記)
Android のタブを使いこなす(アカベコマイリ)
タブ画面を作成する
タブを使ったレイアウト 〜 TabHost と TabWidget
タブメニューを利用する(TechBooster)